Quick tips from the Faculty Teaching Institute about how to implement backwards design.
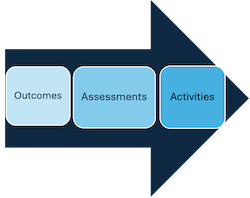
Backwards design is a method for course planning where the instructor starts from the “end goal” or “learning objectives”---what they want their students to know—and then works backwards, designing assessment activities and learning activities that are aligned with the end goal, rather than looking for a classroom activity that seems engaging and related to course content and then creating an assessment that relates to that activity. Using backwards design helps ensure that your instruction and assessments are aligned with your intended outcomes (as shown in the figure below) and that they are supporting students in achieving those goals. Although it is possible to align instruction retroactively, assigning outcomes (or implicitly choosing outcomes) based instruction and assessment, backwards design helps you stay focused on creating a cohesive course that is driven by learning outcomes you’ve thought about carefully.
This Expert Recommendation will outline the three steps of backwards design using an example from a physics class.
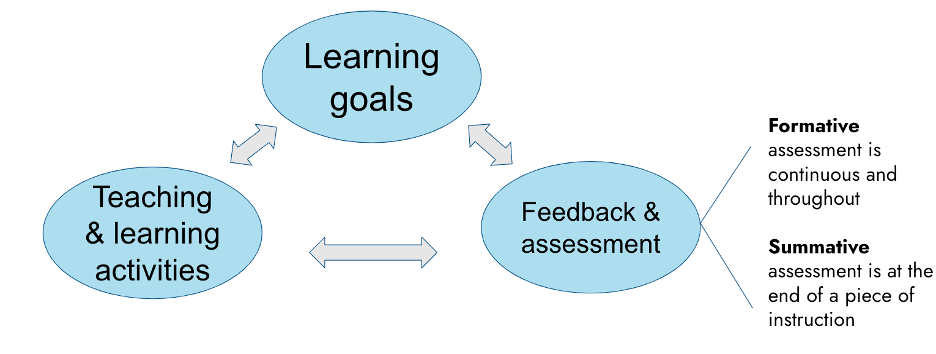
Image adapted from Fink 2013.
Student learning outcomes (SLOs) are:
Student learning outcomes should be specific and measurable. The table below provides some examples of specific, measurable verbs for SLOs.
| Lower-order learning | Higher-order learning | Non-content learning |
|
|
|
Once you have some SLOs, you can use this checklist to ensure they are clear, specific, and measurable:
|
Non-content learning outcomes adapted from Fink's “human dimension,” “caring” and “learning how to learn” dimensions of learning outcomes; see Fink 2013.
For a detailed overview on developing student learning outcomes with many examples for specific physics courses, see the Expert Recommendation “How do I develop student learning outcomes for physics courses?”
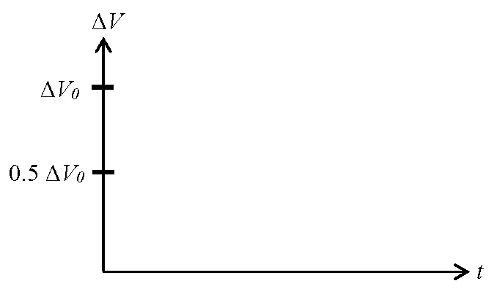
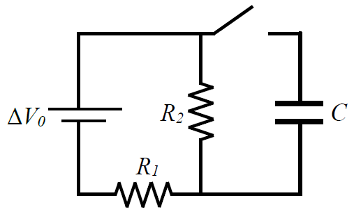
Next, think about what assessments will show evidence of students meeting the specific SLO. Consider both how students will gauge their own learning and how instructors will gauge student learning. For example, for the SLO: “Students should be able to predict changes in voltage across different elements in an RC circuit both when it is charging and when it is discharging,” an assessment task/question could be:
|
The circuit above contains two resistors (R1 and R2), a capacitor, an ideal battery, and a switch. The potential difference across the battery’s terminals is 𝛥V0. On the blank graph (right), sketch a graph of the voltage across R1 and the voltage across R2 as a function of time, from the instant the switch is closed until a long time later. |
This question directly relates to the SLO, assessing if students can predict the change in voltage across components in an RC circuit when it is charging and discharging.
Finally, think about what activities will help students succeed on the assessment and achieve the learning goals. When thinking about instruction, consider what will students do to achieve the SLOs? What is a rough schedule of events? What will happen inside the class vs outside the class? What instructional resources can I draw on? Going back to our example from RC circuits, the lesson design or activity may be:
|
Class begins with think-pair-share with voting questions asking about an RC circuit that has a single resistor, a single capacitor, a single battery, and a switch in connected series. The questions ask students to determine the charge held by the capacitor, the current through the capacitor, and the voltage across the capacitor both when the switch closes (t = 0) and a long time afterwards (t = ∞). Next, students engage in a matching activity where they have to find the graph that best represents (i.e., has the qualitatively correct shape) the above quantities (charge, current, and voltage) as functions of time (for both charging and discharging). This is followed by a mini-lecture showing the mathematical expressions for these quantities and how they come from applying Kirchoff’s loop rule. |
This lesson relates directly to the SLO and scaffolds learning towards supporting students in mastering the content that prepares them for the assessment question.
| Lesson topic: Detection of Exoplanets Doppler Method |
|
Student learning outcomes:
|
|
Assessment Questions/Tasks: Formative: Think-pair-share questions on (1) which exoplanets would be easiest to detect, (2) ranking graphs in terms of greatest doppler shift, and (3) identifying planet position from V vs T graph. Summative: Student white board drawing of V vs T graph and orbital diagram for planet position between zero doppler and max blueshift. Quiz Questions asking students to (1) identify variables that affect doppler shift in system, (2) match V vs T graph and Orbital diagram, and (3) determine time on V vs T graph given location identified on orbit diagram. |
|
Lesson Design and Activities 15 minute interactive lecture to motivate interest in study of exoplanets; help with connecting and identifying critical ideas associated Two body orbital system, and mathematical expression relating Doppler shift to star mass, planet mass and distance; and unpack critical ideas and associations relating V vs T graph to orbital drawings. Use 3-5 think-pair-share questions during lecture and after Lecture-Tutorial activity 20 minutes on Lecture Tutorial activity 10 minutes on White board activity This material is based upon work supported by the National Science Foundation under grants DUE-2141678, 2141745, 2141769, 2141795, and 2142045. Any opinions, findings, and conclusions or recommendations expressed in this material are those of the author(s) and do not necessarily reflect the views of the National Science Foundation. |
You can download this backwards design lesson plan template as a docx or pdf.


 Add a Comment