Superposition of pulses
Variant i Dynamics first Other Variants Interactive tutorial lecture
The tutorial and tutorial homework focus on linear superposition of waves. Fixed-end and free-end reflection are covered.
Topics Waves and optics / Waves: graphs, operational definitions, superposition, symmetry, frequency & wavelength, wave (or pulse) speed, and superposition
Materials
Materials by the UW team
- Instructor Guide


- Pretest
- Exam Questions

- Equipment List
Tutorial details
The tutorial requires a set of demonstrations, some at the start of the session, one at the end.
Combined, the demonstrations should take only about 5 minutes.
Demonstrations
The questions on the first page of the tutorial serve as a guide to the demonstration that should be done. The observations that students make are drawn upon in the tutorial.
One way to make reproducible pulses is to use the “hand-and-foot method” illustrated in the associated demo file. Person 1 pulls on the spring as shown and then releases it without moving his or her foot.
In the demonstrations, students should focus on changes that occur as the pulse moves from one end of the spring to the other, that is, ignore reflections. It is important to have students look for significant changes, such as change in wave speed that occur when the tension is increased. It is useful to discuss explicitly approximations that will be made. For example, to a good approximation, the amplitude of the pulse does not change as it moves from one end of the spring to another. By the end of the demonstration, students should recognize that a pulse moves on a spring at constant speed without changing significantly in size or shape. Only changes to the spring, not the pulse, affect the speed of the pulse.
At the end of the tutorial session, leave time for a demonstration involving reflection from a free end of a spring. The observations that students make are needed in order to complete the homework problem on reflection from a free end. To approximate a free end, attach a small metal loop to one end of the spring, then slide the loop over a rod, such as a ring stand. Hold the rod horizontally at a right angle to the spring. Begin by discussing briefly why it is reasonable to call this end of the spring a “free end.” (For example, ask students which direction each point on the spring moves as a pulse passes. Then ask them if the end of the spring is free to move in that same way.)
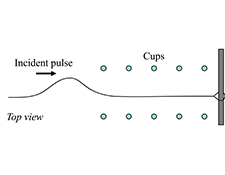
In this demonstration, place a row of lightweight cups on both sides of the spring near the free end. Ask students to predict whether any cups will be knocked down if a pulse with an amplitude that is less than the distance from the spring to the cups is sent down the spring. Then perform the experiment. The intent is to have the free end knock strike one or two cups. It is best to start with a small amplitude pulse and increase the amplitude in successive attempts, if necessary.
Discussion of tutorial
In the tutorial, students examine two time sequences of photographs in which two pulses on a spring approach each other. In the first case, the two pulses are on the same side of the spring; in the second, the pulses are on opposite sides of the spring. Students are led to recognize that the pulses pass through each other and that the principle of superposition can be used to determine the shape of the spring. It is important to check students’ sketches that show the shape of the spring at an instant when two pulses are in the same region of the spring. Many students may have difficulty correctly applying the principle of superposition. If students have difficulty in recognizing that the pulses pass through one another, ask them to compare the sizes and shapes of the incident pulses.
Students then examine reflection of a pulse from a fixed end. They are led to recognize the similarity between (1) reflection by a fixed end and (2) superposition of two pulses on opposite sides of the spring that approach each other. This similarity is used to motivate a way of thinking about fixed-end reflection. (Treating the spring as if it extended beyond the fixed end and imagining that a pulse incident on the fixed end is met by a pulse passing the other way so that the fix end remains stationary.) The students use this model to determine the shape of the spring while an asymmetric pulse is being reflected.
For instruction tips, login or register as a verified educator to see the Instructor Guide.
Prerequisites
Students without experience in Tutorials in Introductory Physics may spend much of this first tutorial learning to explain their reasoning. It is expected that students have previously studied the principle of superposition in other contexts. It is also expected that students have studied basic kinematics. The third homework problem, which develops a model for free-end reflection, requires the ability to apply Newton’s second law to a massless object.
Equipment
Special Instructions
The tutorial starts with a demonstration that requires a spring on a floor with a smooth surface. Check the demonstration before the first tutorial session. The spring should be at least 10 feet long.
The figure below shows how to make pulses for the demonstration:

List
- spring
- white board or large sheet of paper with markers
Coming Soon! We hope to release the discussion section on each tutorial soon.
